|
Ok the ignition install was quite easy. Really, it is not necessary to put
an ignition sys. on the car that I had. It is basically stock except for
the exhaust and air filter. So the ignition sys. I bought premature
because of the bargain price at the time. Anyway, aftermarket ignitions
are for cars that are highly modified. Say if you had Nitrous or Turbo or
some other form of forced induction. Then an ignition may be something to
think about. I chose the JE Omni Magnum. It has a built in computer and
uses the stock coil. It converts the voltage that the stock coil puts out
to the necessary voltage. The computer takes care of that with every
compression. Also, the kit came w/ 8.5mm spark plug wires for added flow
of voltage. I chose this system over the more popular MSD (multiple spark
discharge) because I heard that the MSD system doesn't have a computer and
it only fires multiple sparks which can get too hot for the cylinders. The
JE Omni magnum is supposed to give one spark w/ the correct amount of
voltage the first time to make a full combustion. I also invested in a new
Bosch distributor cap that ran me $40. So here we go......
Materials needed:
- Ingition system (think about it)
- Set of tools
- Drill (for mounting)
- 6 pack of Bud and a friend
- Styrofoam
- Wood
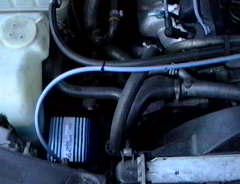
 Well first and foremost, you need to find a place to mount the ignition
computer. It is about 3X5 inches. Here you can see that I mounted it to
where the wire from the computer to the distributor cap reaches w/o any
sharp bends or strain. This picture is if you were standing in front of
the car on the left side of the 3 pointed star. You can see the radiator
on the lower right of pic and the washer fluid on the left if you are
disoriented. I put a flat piece of styrofoam on the bottom of the computer
to avoid mounting metal on metal. Also that area of the car is curved and
the bottom of the ignition computer is flat. So the styrofoam made for a
cheap molding to level the two sides out. Styrofoam is the best material
here because it is not biodegradable and will not rot on you.
Well first and foremost, you need to find a place to mount the ignition
computer. It is about 3X5 inches. Here you can see that I mounted it to
where the wire from the computer to the distributor cap reaches w/o any
sharp bends or strain. This picture is if you were standing in front of
the car on the left side of the 3 pointed star. You can see the radiator
on the lower right of pic and the washer fluid on the left if you are
disoriented. I put a flat piece of styrofoam on the bottom of the computer
to avoid mounting metal on metal. Also that area of the car is curved and
the bottom of the ignition computer is flat. So the styrofoam made for a
cheap molding to level the two sides out. Styrofoam is the best material
here because it is not biodegradable and will not rot on you.
 With the kit came a small regulator. You can see it in the pic above. It
is on the bottom off center to the left. This regulator connects directly
to the stock coil and the ignition computer. Its purpose is to regulate
the voltage coming out of the coil to make it safe for the computer to
take in. It's difficult to see in this picture but the regulator has a
small green wire that extends across the top of the radiator and then
follows to the computer. I mounted the regulator here because it was the
best place (in my opinion) between the coil and the computer. You must
place a small cut piece of wood out to make a direct fit for the regulator
to rest on, do not mount it directly to the radiator b/c the radiator
reaches high temp. that would be unsafe for the regulator. OK, now that we
have the two main pieces in the car and all set. Now is the easy
part......
With the kit came a small regulator. You can see it in the pic above. It
is on the bottom off center to the left. This regulator connects directly
to the stock coil and the ignition computer. Its purpose is to regulate
the voltage coming out of the coil to make it safe for the computer to
take in. It's difficult to see in this picture but the regulator has a
small green wire that extends across the top of the radiator and then
follows to the computer. I mounted the regulator here because it was the
best place (in my opinion) between the coil and the computer. You must
place a small cut piece of wood out to make a direct fit for the regulator
to rest on, do not mount it directly to the radiator b/c the radiator
reaches high temp. that would be unsafe for the regulator. OK, now that we
have the two main pieces in the car and all set. Now is the easy
part......
Now that we have the computer and regulator mounted, take the distributor
wire and connect it to the distributor cap and the computer (avoid the fan
;-) .
 Here you can see the coil. It is located on the right side of the engine.
Take that annoyingly difficult plastic cap off and replace the stock cable
w/ the cable that came from the kit. It connects to the top of the coild
and extends to the regulator (mounted on the radiator). You will need to
go through other cables to get to the regulator but it is easy. Just make
sure you steer clear of the fan.
Here you can see the coil. It is located on the right side of the engine.
Take that annoyingly difficult plastic cap off and replace the stock cable
w/ the cable that came from the kit. It connects to the top of the coild
and extends to the regulator (mounted on the radiator). You will need to
go through other cables to get to the regulator but it is easy. Just make
sure you steer clear of the fan.
 Ok its not really a new step just something to see for clarity on the past
steps. This is the regulator i've been blabbering about. You can see the
tiny green wire extending out to the left over the radiator and then
downward to connect to the computer. You can also see the bigger blue
cable extending toward the coil. Just wanted you to see it better.
Ok its not really a new step just something to see for clarity on the past
steps. This is the regulator i've been blabbering about. You can see the
tiny green wire extending out to the left over the radiator and then
downward to connect to the computer. You can also see the bigger blue
cable extending toward the coil. Just wanted you to see it better.
RESULTS:
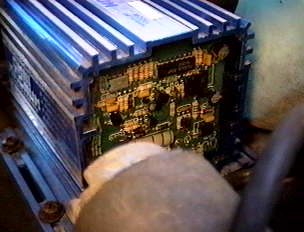
 Here is a tricky shot of the ignition computer. I put the clear side
facing the back of the car for wiring purposes. Well hope this comes in
handy for people. Enjoy.
Here is a tricky shot of the ignition computer. I put the clear side
facing the back of the car for wiring purposes. Well hope this comes in
handy for people. Enjoy.
Back
|