|
Materials needed:
- 1/2" drive socket wrench
- Hydrolic jack
- Jack stands
- 1/4" drive socket wrench
Note: you do not need the spring compressors for the rear spring removal
and installation. This is much easier and less stressful than the front
assembly.
I shouldn't have to tell you this but stabalize your car on jack stands on
both sides of the car. Be sure to find a spot that is stable. Remove your
wheels :-).
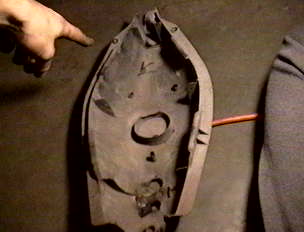
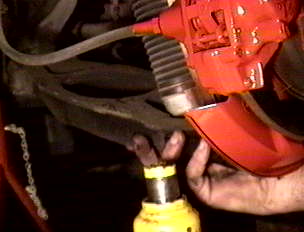
 Here I am pointing to a spot on the rear spring support arm plastic cover.
What I'm pointing at is where the mounting bolt (yes, even this peice of
plastic has a mounting bolt) for the plastic arm cover. Remove this bolt
from the cover and then remove the plastic cover. I took the picture while
it was off the car for clarity.
Here I am pointing to a spot on the rear spring support arm plastic cover.
What I'm pointing at is where the mounting bolt (yes, even this peice of
plastic has a mounting bolt) for the plastic arm cover. Remove this bolt
from the cover and then remove the plastic cover. I took the picture while
it was off the car for clarity.
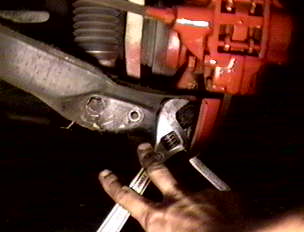
 Ok pay attention. This is easy. On the side of the spring support arm are
3 bolt and nut set up. One for the anti roll bar, one for the rear strut,
and the last is for the hub carrier. Here I'm pointing to two of the three
and the third bolt the creseant wrench is on.
Ok pay attention. This is easy. On the side of the spring support arm are
3 bolt and nut set up. One for the anti roll bar, one for the rear strut,
and the last is for the hub carrier. Here I'm pointing to two of the three
and the third bolt the creseant wrench is on.
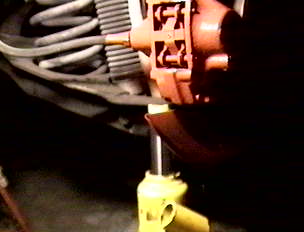
 Use the hydro jack to jack up the spring support arm (SSA) in order to
release the tension. Remove all three of the nuts from the bolts and
carefully remove the bolts.
Use the hydro jack to jack up the spring support arm (SSA) in order to
release the tension. Remove all three of the nuts from the bolts and
carefully remove the bolts.
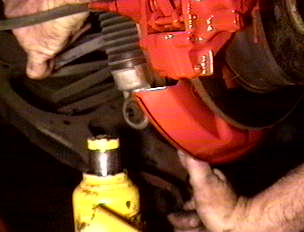
 After you remove the 3 nuts and bolts, carefully lower the hydrolic jack
and then remove the hydrolic jack from under the SSA. From here, simply
push the SSA down while removing the spring.
After you remove the 3 nuts and bolts, carefully lower the hydrolic jack
and then remove the hydrolic jack from under the SSA. From here, simply
push the SSA down while removing the spring.
INSTALLATION:
 This is the SSA by itself. The Install is the exact opposite of the
removal. Just be sure to use the hydro jack to line everything up when
putting the bolts back in. Remember to always use extreme caution when
working on your car. Any injuries caused by this process is of the sole
responsibility of the mechanic. Good luck!!!
This is the SSA by itself. The Install is the exact opposite of the
removal. Just be sure to use the hydro jack to line everything up when
putting the bolts back in. Remember to always use extreme caution when
working on your car. Any injuries caused by this process is of the sole
responsibility of the mechanic. Good luck!!!
Back
|